
How to Drill a Perfect 28mm Hole for a 3/4" Tank Connector


Building your own enzyme bin? ♻️ Need to add a tap or an outlet to your water container? You’re in the right place! This guide will walk you through drilling a clean, leak-free 28mm hole, which is the size needed to install a 3/4″ BSP tank connector (the fitting that will connect to your 20mm PVC pipe).
The most common mistake people make is drilling the wrong size hole or cracking the container. 😱 Let’s get it right the first time!
🧰 Tools and Materials
-
Drill: A standard powered drill is perfect. ⚡
- The Right Bit: A 28mm Hole Saw is the best tool for this job. A spade bit or step drill can work, but a hole saw gives the cleanest, most accurate cut in plastic. ⚙️
-
Tank Connector: Your 3/4″ BSP fitting (which will have one or two rubber gaskets).
⭐ The Main Character: The PVC Tank Connector

In this whole DIY project, the real “hero” 🦸♂️ or main character 🎬 is not the tap, not the pipe, and not even the bin… it’s this special fitting: the PVC Tank Connector.
You might also know it as a “bulkhead fitting”. This little piece of plastic is the only thing that lets you pass water from the inside of the container to the outside, without a single drop leaking. 🚫💧
Why is it the Main Character?
Everything else (the tap 🚰, the pipe) just screws onto this piece. The tank connector is the part that does the real magic: ✨ it creates the waterproof seal against the container wall.
How It Works: The "Sandwich" Method 🥪
A tank connector is simple but very clever. It comes in two main parts, plus one or two rubber gaskets (washers):
- The Main Body: This is the long, threaded part. This part goes on the inside of your bin.
- The Rubber Gasket(s): This is the most important bit for stopping leaks! 🤫 It’s a soft rubber ring. One goes on the inside, pressed against the container wall. (Sometimes there is a second one for the outside).
- The Backnut (or Locking Nut): 🔩 This is the nut you screw on from the outside.
When you tighten the backnut, it “sandwiches” the container wall between the main body’s gasket on the inside and the backnut on the outside.
Inside Bin ➡️ [Gasket] ➡️ [Container Wall] ➡️ [Backnut] ⬅️ Outside Bin
This “sandwich” pressure squashes the rubber gasket, creating a perfect, watertight seal.
This is exactly why we use the 28mm hole saw! 🕳️ It’s the perfect size for the threaded body of a 3/4″ (20mm) tank connector to pass through, giving the gasket a snug, flat surface to seal against.
Get this part right, and your project is a guaranteed success! 🏆🎉
🤔 Understanding Common PVC Pipe Sizes
When you see PVC pipe sizes like 1/2″ (15mm), 3/4″ (20mm), and 1″ (25mm), it can be confusing 😵 because the numbers don’t seem to match up with a ruler. 📏
The key idea is that these are nominal sizes. This means they are just “names” for the pipe, not its exact physical measurements. The size refers to the approximate inside diameter (the “bore”) of the pipe, which determines its flow capacity. 💧
-
1/2″ (15mm): This is a small-diameter pipe. It’s typically used for low-flow jobs like a single tap 🚰, a toilet cistern supply, or micro-irrigation feeder lines.
-
3/4″ (20mm): This is a very common, versatile size. 👍 It offers a good balance of flow and pressure and is widely used for garden hose connections 🌿, main lines for small irrigation systems, and—as in our project—outlets for water containers. 🪣
-
1″ (25mm): This is a larger-diameter pipe used when you need higher water volume. 🌊 It’s often used for main water supply lines into a property or for the backbone of a larger irrigation system.
✂️ In case you haven't seen a PVC pipe cutter...

When you work with PVC pipe (like our 20mm pipe), you need to cut it. You could use a hacksaw 🪚, but it’s messy 😖, slow 🐢, and leaves a very rough, dusty edge that needs a lot of cleaning up.
This is where a PVC pipe cutter comes in. It’s a game-changer! 🌟
It looks like a strong pair of shears or secateurs (like you’d use in the garden 🌿).
-
It has one sharp, V-shaped blade and a curved jaw to hold the pipe.
-
You simply open the cutter, place the pipe in the jaw, and squeeze the handle. 💪
-
Most of them have a ratchet mechanism, so you just squeeze a few times, and it clicks, applying more pressure until… pop! 💥
-
It gives you a perfectly clean, straight, and burr-free cut in seconds. ⏱️✨
Why use this? 🤔 When you glue PVC pipes together (solvent welding), you need the end of the pipe to be perfectly square and clean so it sits fully in the fitting.
A clean cut from this tool guarantees a strong, leak-proof joint. ✅ 🚫💧 It’s a small tool that makes your plumbing work look 100% more professional. 🧑🔧💯
⚠️ A Quick Note: Why I'm Using a 28mm Hole Saw
This is the most important part of the project, so please read this carefully! 💡
You are not drilling a hole for the pipe. You are drilling a hole for the fitting.
-
I have a 3/4″ (20mm) PVC pipe.
-
To connect this, I’m using a 3/4″ PVC V Tank Connector (also called a bulkhead fitting).
Now, the standard thread for a 3/4″ BSP fitting is actually smaller (about 26.44mm). This is why most guides 🤓 will tell you to use a 26mm hole saw.
So, why am I using a 28mm hole saw? 🤔
This means the hole I’m drilling is intentionally a bit larger than the fitting’s threads. This is a special situation, and it makes the sealing step extra critical! ‼️
I am doing this only because the rubber gasket that came with my specific PVC V Tank Connector is very large and wide 🐘. A 28mm hole gives me a little “wiggle room” for positioning, but I am relying 100% on this big gasket to press against the flat container wall and create the seal over this slightly larger hole.
This is the most important warning: If your tank connector’s gasket is small and only slightly wider than the threads, a 28mm hole WILL BE TOO BIG, AND IT WILL LEAK! 💧💧💧
Always check the gasket that comes with your own fitting first! 👀
Because my gasket is wide, the 28mm hole works for me. But it requires very careful tightening to make sure the gasket is perfectly flat and sealed.
If you are in any doubt, just use a 26mm hole saw. It provides a much snugger (and safer) fit for the threads. 👍
💡 In case you haven't seen a hole saw...

No worries! It might look a bit intimidating 😱, but it’s a super useful tool. 💪
If you’ve only ever used regular drill bits (the small twisty ones), a hole saw is specialised for making large, perfectly round holes. 🕳️
🤔 Think of it as a small, hollow cup with saw teeth on the rim. Here are its main parts:
-
The Saw (The “Cup”): 🥤 This is the part that has the size stamped on it (like 28mm for our project). Its sharp teeth are what cut the big circle through the plastic.
-
The Pilot Drill Bit (The Centre Bit): 🎯 This is the regular-looking drill bit right in the centre. This is the most important part! It drills a small hole first, which anchors the tool and stops the big saw from slipping or “walking” 🚶♂️ all over your container.
-
The Mandrel (The Base): This is the piece that holds both the pilot bit and the saw cup, and the other end of it goes into your drill ⚡, just like a normal bit.
Why use this? ✨ You need a perfectly clean, round 28mm hole for the tank connector’s rubber gasket to seal properly. A hole saw is the only tool that does this quickly 💨 and cleanly in plastic. 🏆
🔵 Hole Saw vs. 💎 Dry Diamond Core Drill
These tools are designed for very different materials and jobs. Using the wrong one will lead to a bad result! 👎
🔵 Hole Saws
A hole saw is a cylinder with saw teeth on the edge and a pilot drill bit in the centre.
-
How it Works: It saws the material. 🪚 The pilot bit locks onto the centre point, and the spinning teeth cut a circular path, removing a “plug” of material.
-
Best For: Softer materials like plastic (your water container 🪣), wood 🪵, plasterboard, and thin metal.
-
Action: Aggressive and fast! 💨
-
Why for your project: It’s the ideal choice. 👍 It will cut quickly and cleanly through the plastic of your water container without melting it (if you use a medium speed).
💎 Dry Diamond Core Drill Bits
A diamond core bit is a hollow cylinder with industrial diamonds fixed to the cutting edge.
-
How it Works: It grinds the material. Instead of sawing teeth, the super-hard diamonds slowly abrade and pulverise the material into dust.
-
Best For: Very hard, brittle materials like porcelain tile, ceramic 🏺, granite, stone 🪨, and brick 🧱.
-
Action: Slow and abrasive. 🐢
-
Why not for your project: 🚫 It would be very slow and would likely melt the plastic due to the high-friction grinding action. Using this on plastic would be like trying to cut bread with a grinding wheel! 🍞
🏆 Summary: The Right Tool for the Job
| Feature | 🔵 Hole Saw | 💎 Dry Diamond Core Drill |
| Cutting Action | Sawing (Teeth) | Grinding (Diamond Grit) |
| Best Materials | Wood, Plastic, Metal | Tile, Stone, Brick, Ceramic |
| Speed | Fast 💨 | Slow 🐢 |
| Result on Plastic | Clean, fast cut ✅ | Melts and gums up ❌ |
| Result on Tile | Will shatter the tile 💔 | Clean, smooth hole ✅ |
👣 Step-by-Step Guide
1. Pick Your Spot 📍
Decide where the fitting will go. Make sure you’ve chosen a flat, smooth area of the container. This is vital for the rubber gasket to create a perfect seal. Also, check that you can reach the inside of the container to tighten the fitting’s backnut.
2. Mark Your Centre ✏️
Use your marker pen to mark the exact centre of where you want the hole.
3. Drill a Pilot Hole (Optional but Recommended) 👍
Using a small, standard drill bit (e.g., 3-4mm), drill a small pilot hole directly on your centre mark. This will stop the larger hole saw from “walking” or slipping when you start.
4. Drill the 28mm Hole 🕳️
-
Attach your 28mm hole saw to your drill.
- Place the hole saw’s centre pilot bit into the pilot hole you just drilled.
- Start the drill before the saw teeth touch the plastic.
-
Use medium speed and light, steady pressure. Don’t force it. Let the saw’s teeth do the cutting.
-
Pro-Tip: If you drill too fast, you’ll melt the plastic. 🔥 If you push too hard, you risk snagging and cracking the container. Slow and steady wins. 🐢
-
5. Clean and Deburr the Hole (The Most Important Step!) ✨
Your hole will have rough, raised edges of plastic (called “swarf”). If you leave these, your gasket will not seal and it will leak. 💧
- Carefully use a sharp utility knife or a deburring tool to shave off all the rough edges from both the inside and outside of the hole.
-
The goal is a perfectly smooth, flat surface. Run your finger over it; it should feel clean.
6. Install the Tank Connector 🔩
-
Your tank connector has a main body and a backnut. One gasket should be on the main body.
- From the inside of the container, push the main body’s thread through the hole so the gasket is on the inside, pressed against the container wall.
- From the outside, place the second gasket (if included) and then screw on the backnut.
-
Tighten by hand first until it’s snug. Then, use a wrench to give it just a slight extra turn (about 1/4 to 1/2 turn is usually enough). Do not overtighten! 🚫 You can strip the plastic threads or crack the container. The rubber gasket does the sealing, not the force.
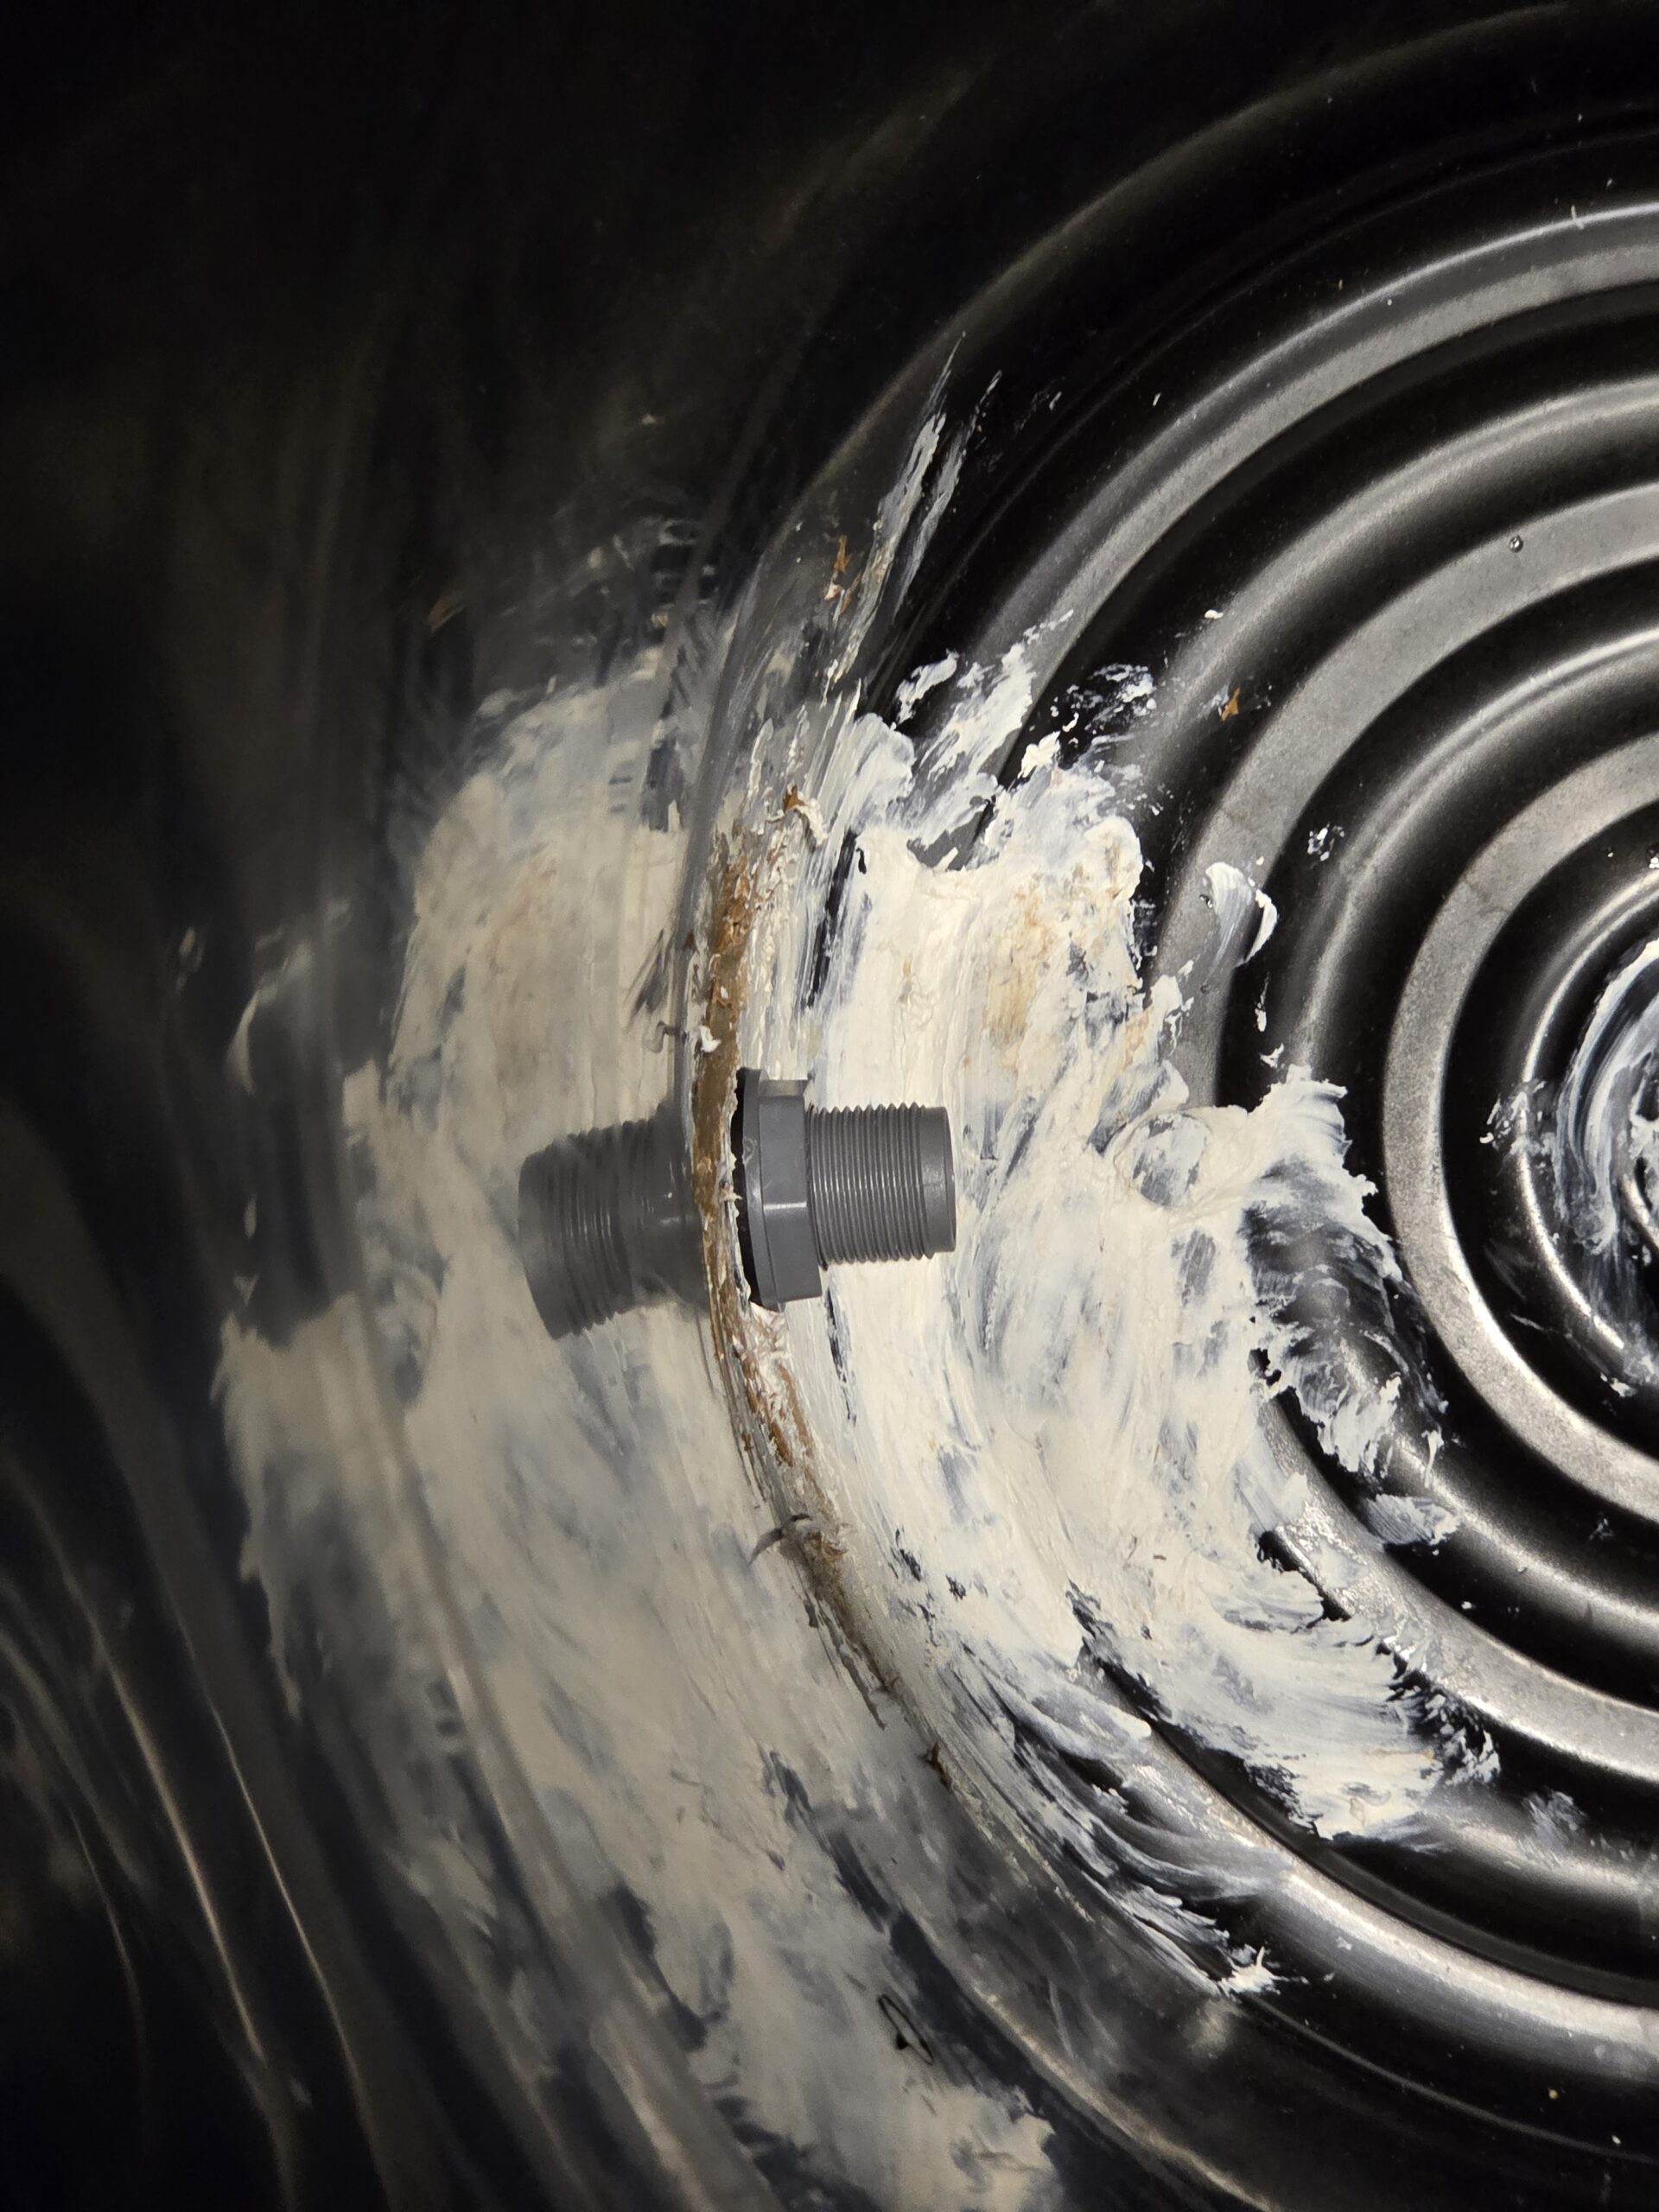
✅ Final Check & What We've Learnt!
And there we have it! 🥳 The tank connector is successfully installed.
Phew! That was the most critical part of making this enzyme bin for my wife. 👩🍳 We’ve definitely learnt a few key things on this little DIY journey:
-
The Right Tool is Everything: The 🔵 Hole Saw was the perfect choice for cutting a clean, fast hole in the plastic bin. That 💎 Diamond Core Drill is strictly for hard tiles and would have just melted the plastic!
-
The “Main Character” 🦸♂️: We learnt that the real hero is the PVC Tank Connector. It’s not the tap, but this clever “sandwich” 🥪 fitting that does the magic of creating the waterproof seal.
-
The 28mm vs 26mm Secret 🤫: This was the biggest lesson! We successfully used a 28mm hole saw, but only because our specific connector came with a very large, wide gasket 🐘. We know that if our gasket had been smaller, a 28mm hole would have leaked 💧, and the “safer” 26mm hole saw would have been the right choice.
-
Clean Cuts Matter: Using the ✂️ PVC pipe cutter instead of a messy hacksaw means our pipes are perfectly square, ready for a strong, leak-proof joint.
Now for the easy part! We can attach the 20mm PVC pipe and tap to the connector. A bit of PVC solvent cement (glue) will lock it all in place, making sure it’s watertight.
The All-Important Leak Test! 🕵️♂️ Before my wife starts adding her fruit peels 🍊🍋 and kitchen scraps, we must do the final check.
Fill the container with a bit of water 🚰… and we wait. Check all around the new gasket and fitting for any sign of a drip.
If it’s all bone-dry… Mission Accomplished! ✅ We have a perfect, leak-proof enzyme bin. She’s going to be so happy with our professional-looking work! 🥰